Knowing how to check battery with multimeter tools is a vital skill for every driver in 2026. By performing this simple test, you can quickly identify if your vehicle’s power issues stem from a failing battery or a more complex electrical system failure.
Have you ever turned your key in the ignition on a chilly morning, only to be met with that dreaded clicking sound? It is a moment of frustration that every driver knows all too well. In 2026, as vehicle technology continues to evolve, the reliable lead-acid battery remains the heart of your car’s electrical system. Learning how to check battery with multimeter devices is one of the most empowering skills you can develop as a vehicle owner. It turns a mystery into a simple diagnostic task you can handle right in your own driveway.
You do not need to be a professional mechanic to understand the health of your power supply. With just a few minutes of time and a simple handheld tool, you can save yourself a trip to the repair shop. This guide will walk you through the process, ensuring you feel confident the next time you suspect your battery might be nearing the end of its life.
Key Takeaways
- Safety First: Always wear eye protection and ensure your multimeter is set to the correct DC voltage range before touching battery terminals.
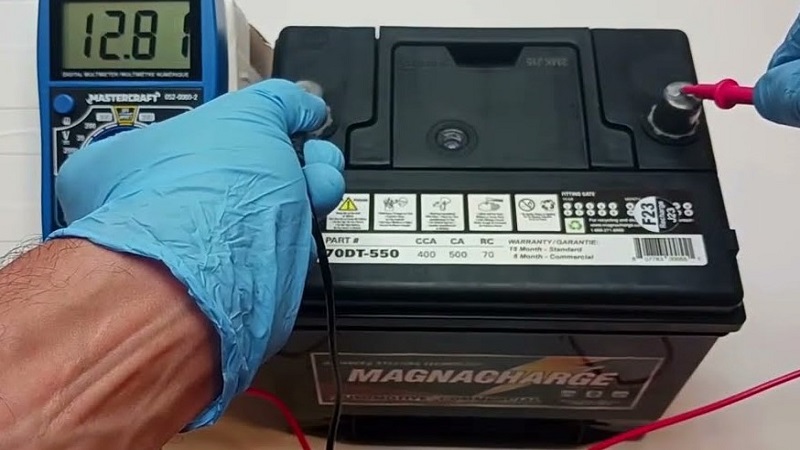
- Resting Voltage: A healthy 12-volt car battery should read between 12.6 and 12.8 volts when the engine is completely turned off.
- Running Test: When the engine is running, the voltage should climb to between 13.5 and 14.5 volts, indicating that the alternator is charging properly.
- Load Testing: Simply checking resting voltage is helpful, but a load test is the only way to confirm if a battery can handle the strain of starting an engine.
- Visual Inspection: Always look for corrosion on terminals or swelling on the battery casing, as these are immediate warning signs that a replacement is needed.
- Tools Required: A basic digital multimeter is sufficient for most modern vehicle diagnostics, making this a cost-effective DIY maintenance habit.
Understanding the Basics of Battery Health
Before you dive into the technical steps of how to check battery with multimeter tools, it helps to understand what the numbers actually mean. A car battery is essentially a chemical storage unit for energy. Over time, that chemical process loses its efficiency. When you measure voltage, you are essentially looking at the electrical pressure available to push current through your car’s circuits.
Why Voltage Matters
Most modern passenger vehicles utilize a standard 12-volt system. However, a battery is rarely exactly 12.0 volts. A fully charged battery, when sitting idle, usually sits at about 12.6 or 12.8 volts. If your multimeter shows a reading below 12.4 volts, your battery is likely undercharged. Anything below 12.0 volts often indicates that the battery is either heavily discharged or potentially damaged beyond recovery.
The Role of the Alternator
It is important to remember that the battery does not work alone. The alternator is responsible for keeping the battery topped off while you drive. When you check your battery voltage while the engine is running, you are effectively testing the alternator’s performance. If you see a voltage reading that stays low even while the car is running, your problem might not be the battery at all – it could be a faulty alternator.
Preparing to Test Your Battery Safely
Safety is the most important part of any DIY automotive repair. Before you start the process of how to check battery with multimeter instruments, take a moment to prepare your workspace. Always park your car on a level surface, turn off the ignition, and engage the parking brake. If you have been driving recently, let the car sit for at least thirty minutes so the battery can cool down and the chemical reaction can stabilize.

Visual guide about How to Check Battery with Multimeter
Image source: i.ytimg.com
Setting Up Your Multimeter
Digital multimeters are incredibly versatile. To check a car battery, you need to set the dial to the DC Voltage section, usually marked with a “V” followed by a straight line and dots. Choose the 20-volt setting, as most cars will never exceed this during a standard test. If you set it to a lower range, the screen might show an error, and if you set it too high, you might lose the precision needed to see if your battery is failing.
Checking for Visible Damage
Before connecting the leads, look at the battery casing. Are there any cracks or bulging sides? Is there a white or blue crusty buildup around the metal posts? These are clear signs of terminal corrosion. If you see this, use a wire brush and a mixture of baking soda and water to clean the area before proceeding. A poor connection often gives a false reading on your multimeter.
Performing the Resting Voltage Test
The resting voltage test is the most common way to get a baseline for your battery health. This test measures the battery’s state of charge when it is not being taxed by the starter motor or the alternator. It is the best way to see if your battery is holding a charge overnight.
Connecting the Probes
Identify the positive and negative terminals on your battery. Usually, the positive terminal is red and marked with a plus sign, while the negative is black with a minus sign. Take the red probe of your multimeter and touch it to the positive terminal. Take the black probe and touch it to the negative terminal. You should immediately see a number appear on your digital screen.
Interpreting the Results
Once the probes are steady, observe the number. If the reading is 12.6V or higher, your battery is in great shape. A reading between 12.4V and 12.6V is acceptable, though it might indicate that you do not drive long enough to keep the battery fully topped off. If your reading is 12.2V or lower, it is time to consider charging the battery with an external charger or, if the problem persists, buying a replacement.
Advanced Diagnostics: The Load Test
While the resting voltage test is great, it is not the whole story. A battery can show 12.6 volts but still fail the moment you try to start the car. This is because the battery cannot handle the “load” required to turn over the engine. This is where knowing how to check battery with multimeter performance under stress becomes essential.
The Crank Test Procedure
For this test, it helps to have a friend. Connect your multimeter leads to the terminals just like you did before. Have your friend sit in the driver’s seat. Ask them to turn the ignition and crank the engine. While they are cranking, watch the multimeter screen closely. The voltage will dip as the starter pulls power from the battery.
Analyzing the Voltage Drop
If the voltage drops below 9.6 or 10 volts during the cranking process, it indicates that the battery’s capacity is failing. While it might still be able to run your lights and radio, it does not have the “oomph” required to start the engine reliably. If your battery drops significantly during this test, you should plan to replace it soon to avoid being stranded.
Testing While the Engine is Running
You have checked the battery alone, but what about the charging system? Sometimes, people replace a battery thinking it is the culprit, only to find the new one dying a few weeks later. This usually happens because the alternator is not doing its job. By learning how to check battery with multimeter while the car is running, you can rule out the charging system.
Monitoring Alternator Output
Start your car and let it idle for a minute or two. Keep your multimeter connected to the battery terminals as before. You should notice the voltage climb significantly from your resting reading. A healthy alternator should push the voltage up to somewhere between 13.5 and 14.5 volts. This confirms that current is flowing back into the battery to keep it charged.
Identifying Charging Failures
If the reading remains at 12.6 volts or drops even lower after the engine starts, your alternator is likely not working. It may be a loose belt, a bad connection, or a failing alternator unit itself. If you see a number higher than 15 volts, that is also a red flag, as your voltage regulator might be malfunctioning and overcharging the battery, which can lead to overheating and potential damage.
Common Troubleshooting Tips for 2026 Vehicles
Modern vehicles in 2026 are packed with electronics, from advanced driver-assistance systems to complex infotainment hubs. These systems can sometimes cause a “parasitic draw” that drains your battery even when the car is parked. If you find your battery is consistently low despite the alternator working fine, you might have a hidden electrical drain.
Dealing with Parasitic Drain
If you suspect something is draining your battery, you can use your multimeter in “amperage” mode, though this is a slightly more advanced technique. By disconnecting the negative terminal and placing the multimeter in series with the battery, you can measure how much current is flowing out of the battery while the car is completely off. If the draw is high, you likely have a faulty relay or a device that isn’t powering down properly.
Regular Maintenance Habits
The best way to extend the life of your battery is to keep it clean and tight. Check the mounting bracket to ensure the battery isn’t vibrating while you drive. Excessive vibration can damage the internal plates of the battery. Also, if you live in an area with extreme temperatures, remember that heat is actually harder on batteries than cold.
Regularly checking your voltage in the spring can help you catch a failing battery before the extreme summer heat kills it completely. In conclusion, knowing how to check battery with multimeter tools is one of the most practical skills you can possess.
It saves time, it saves money, and most importantly, it gives you peace of mind. By spending just a few minutes performing these tests, you can distinguish between a simple battery swap and a more expensive alternator issue. Stay proactive with your car maintenance, and you will find that your vehicle stays on the road much longer.
Frequently Asked Questions
Is it dangerous to touch the battery terminals with a multimeter?
No, it is safe as long as you do not touch both terminals with the same metal object or allow the metal probes to touch each other. Always ensure your multimeter is set to the voltage setting before touching the probes to the battery posts.
Can I test a battery while it is still in the car?
Yes, you absolutely can and should test the battery while it is installed. This allows you to check not only the battery’s resting voltage but also the alternator’s performance while the engine is running.
What does it mean if my multimeter reads 0 volts?
A reading of zero usually indicates a completely dead battery, a broken connection, or a faulty multimeter probe. Check your probe connections and ensure your multimeter dial is set to the correct DC voltage range before assuming the battery is dead.
How often should I check my car battery?
It is a good habit to check your battery every six months or before any long road trip. If your battery is more than three years old, you might want to test it more frequently to monitor its decline.
Will a multimeter tell me if I need a new battery?
It will give you a very strong indication. While a professional “load tester” at a shop is the most accurate, a multimeter test showing low resting voltage or a significant drop during engine cranking is a clear sign that replacement is likely needed.
Does the color of the multimeter probes matter?
Yes, the red probe should always go to the positive terminal and the black probe to the negative. If you swap them, the multimeter will simply display a negative sign before your voltage reading, but it won’t harm the tool or the battery.